The best part of Landscape Photography is getting out and enjoying nature. Our travels have taken us to some amazing places and I will be forever grateful for the opportunity to explore our incredible country.
In this final post of the series, I will share the planning, shooting, and processing decisions for several images. They were made in different locations, conditions, times of day, etc. to give you a starting point in your landscape photography journey. Remember to always start with researching the area and understanding what draws you to it that you want to point your lens at to remember or share with others.
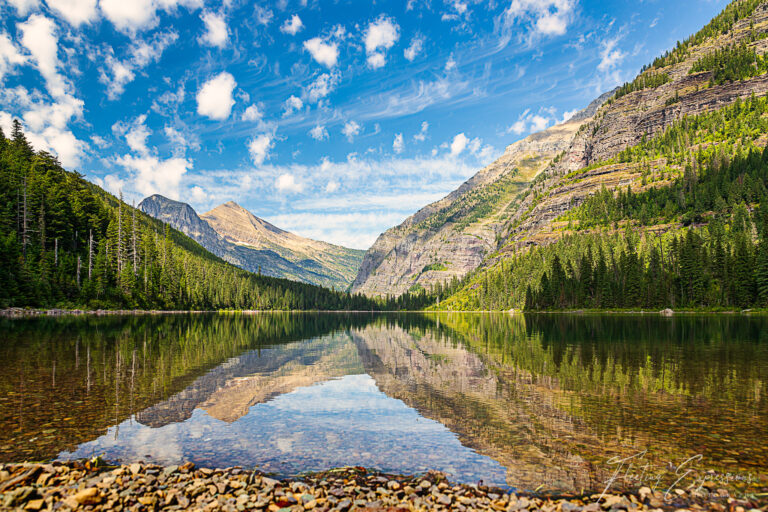
The image above was captured in Glacier National Park. I placed my camera low to the ground on my Platypod to get as much of the reflection as possible. I took advantage of the reflective surfaces of Avalanche Lake to create a symmetrical composition that mirrors the beauty of the distant mountains.
Toketee Falls
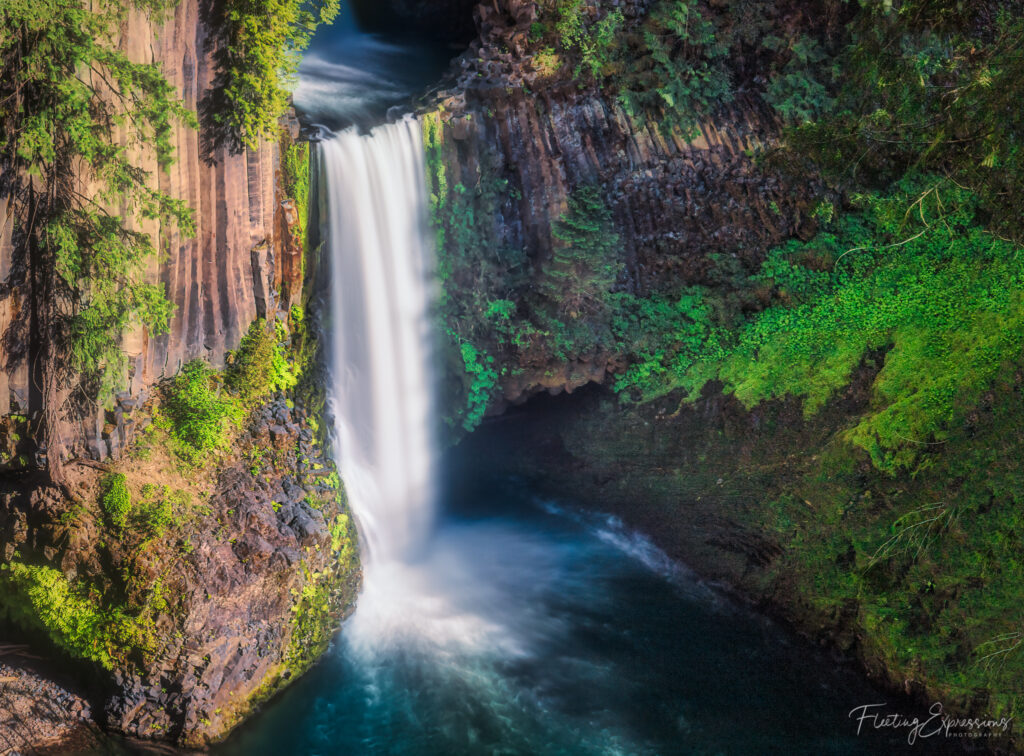
Toketee Falls is located in the Umpqua National Forest in Oregon. A short hike of less than a half mile from the trailhead will get you to the viewing platform where you will have a decision to make. You can choose to shoot your image from there or you can navigate through the hole in the fence and scramble down a steep, rocky embankment to get a more direct angle of the falls. I think it’s clear which choice I made but I can’t say I won’t attempt the other option in the future! With over 200 known waterfalls, Oregon will remain a top destination choice for me.
Planning the Shoot
One of the most interesting waterfalls, Toketee has unique geological formations that make it a great subject for a waterfall image. Overcast skies provide diffused light and reduce the shadows on the water so pick a day with a white sky or shoot during golden hour. Most waterfalls require a hike. I use All Trails to read reviews and help decide if the trail is within my abilities.
Selecting the Frame
For this composition, I used the rule of thirds and let the leading line of the water determine the placement on the left third. The long exposure allows for smooth water and the interesting shapes of the pooling water provide foreground interest.
Processing the Image
Adjust the exposure to ensure proper brightness levels throughout the image, and fine-tune contrast to enhance the overall tonal range and depth. Balancing exposure and contrast can help bring out details in both shadows and highlights, creating a more dynamic and visually appealing image. Correct the white balance to ensure accurate color representation in the water. There’s a fine line between too cool (blue water) and to warm (yellow water).
Black Mesa Milky Way
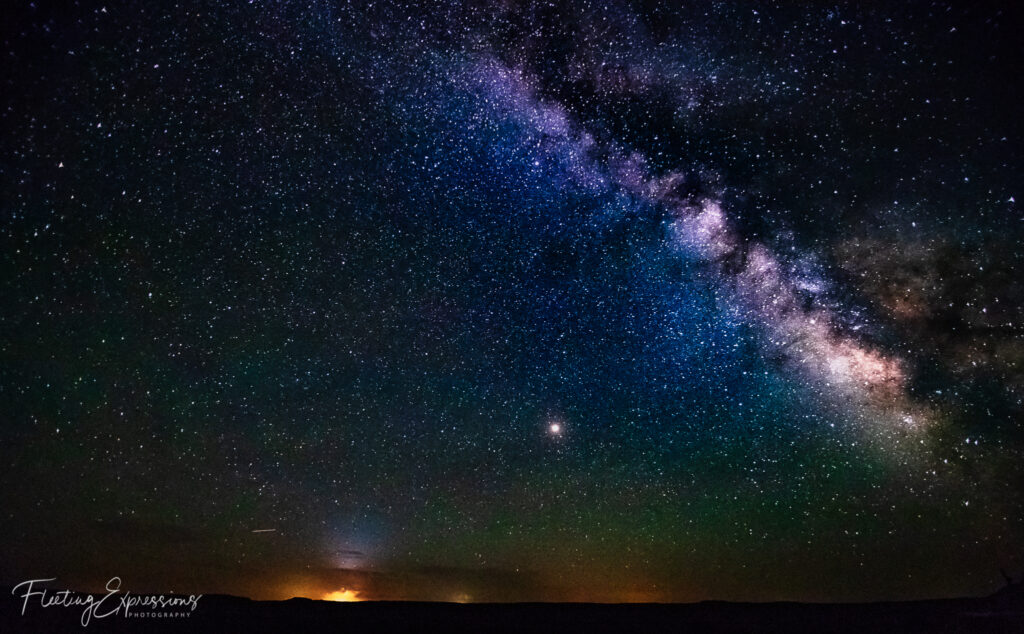
Night photography is one of my favorite genres! Capturing a landscape at night requires a lot of patience and practice but it is so worth it! Black Mesa State Park, in the farthest corner of the panhandle of Oklahoma, is one of the best dark skies in the state. I think this might be one of my first Milky Way images and while it seems a bit over-processed to me now, it is still one of my all-time favorites!
Planning the Shoot
The top considerations for a successful Milky Way shoot are dark skies, the moon phase and weather conditions. Light pollution is a real challenge in most areas. You can use apps and websites like Dark Sky Finder to help you identify suitable locations for stargazing and astrophotography. Some extra gear to have on hand: a headlamp, a red light to maintain your night vision, and a stool or chair to make the wait time more comfortable.
Selecting the Frame
Position the Milky Way’s galactic center prominently in your composition to create a focal point and draw the viewer’s attention. Incorporate interesting foreground elements into your composition to add depth and context to the Milky Way scene. Rocks, trees, mountains, or other landscape features can serve as anchor points and provide a sense of scale, contrast, and visual interest against the backdrop of the night sky. (This photo illustrates what NOT to do.) Use a wide aperture (low f-stop) to let in as much light as possible, and set a long shutter speed to gather enough light from the faint stars.
Processing the Image
Apply noise reduction techniques to minimize digital noise and graininess in the image, particularly in the dark areas of the night sky.Fine-tune contrast and clarity to enhance the overall tonal range and detail in the Milky Way and surrounding sky. Adjusting contrast can help bring out the faint details and structure of the Milky Way, while clarity adjustments can enhance sharpness and definition in the stars and nebulae. Correct the color balance to ensure accurate representation of the Milky Way’s natural colors, adjusting for any color casts or tinting caused by light pollution or atmospheric conditions. Enhance the vibrancy and saturation of the Milky Way’s colors to make them pop against the dark background of the night sky.
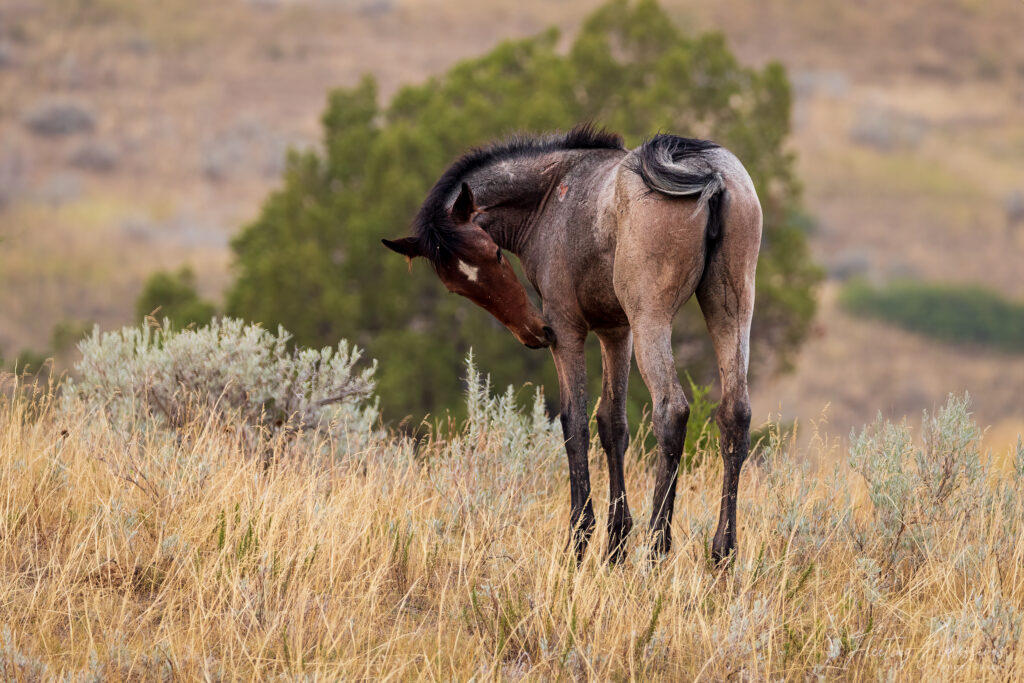
Grand Tetons National Park
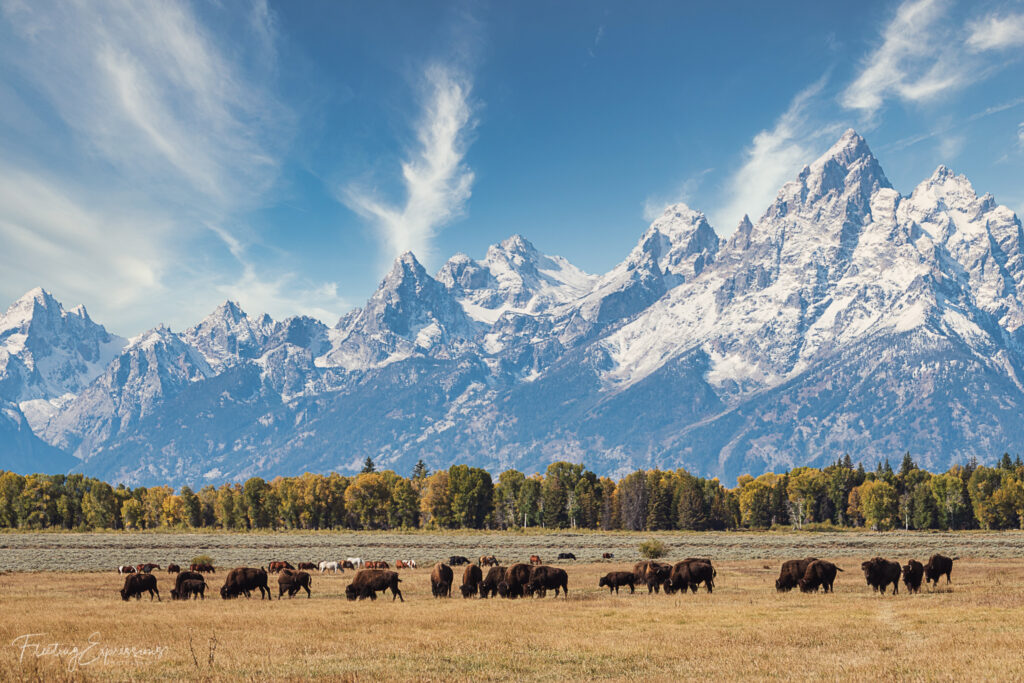
Two places will make my heart sing and Grand Tetons National Park is one of them. (Waterfalls are the other, see above!) When I’m asked what my favorite national park is the answer is simple for me, Grand Tetons. Capturing layers of bison, horses, and mountains was magical and a day I won’t forget.
Planning the Shoot
Research and scout for iconic and lesser-known scenic locations within Grand Teton National Park that offer stunning views of the mountains, lakes, rivers, and wildlife. This spot was just off the road as I was making my way to a more popular spot in the park. Consider the time of year and seasonal variations in weather, vegetation, and lighting. Spring offers opportunities for wildflowers and melting snow, while autumn showcases vibrant foliage colors against the backdrop of the Tetons. I’m partial to fall colors and snow on the stunning Tetons. Consider the position of the sun and shadows when composing your shots to avoid harsh midday light and achieve balanced exposures.
Selecting the Frame
Leading lines add depth and perspective to your composition. I let the rows of bison and horses guide the viewer’s gaze and immerse them in the landscape. They also provided a great foreground element and a sense of scale against the backdrop of the towering mountains.
Processing the Image
Traditional landscapes maintain a natural look. Aim to enhance the beauty of the landscape while preserving its natural appearance. Focus on subtle adjustments that enhance the image’s overall balance, contrast, and clarity while staying true to the original scene. I could have warmed up the mountains more but I liked the contrast of cool and warm tones. Don’t be afraid to experiment with different editing techniques and creative effects to achieve the desired look and feel for your landscape image.
Desert Sunset
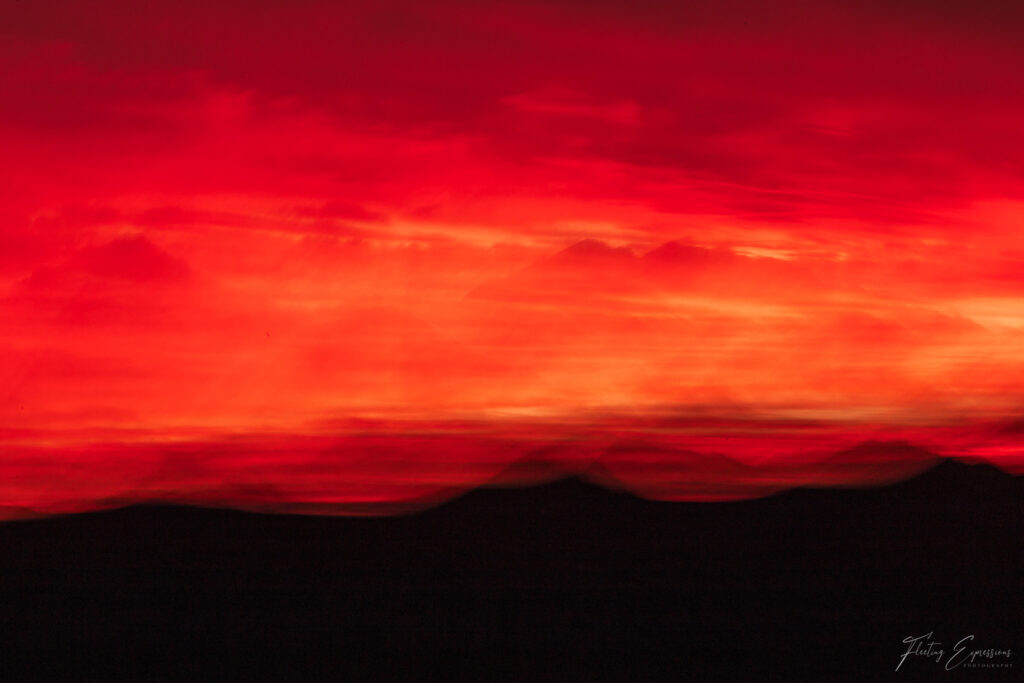
One of my favorite new ways to capture landscapes is with the ICM (Intentional Camera Movement) technique. I especially love it at sunrise or sunset, like in the above image. This style draws on the emotions of the viewer and creates a deeper connection, similar to a painting.
Planning the Shoot
You can shoot ICM landscapes at any time of the day, however you may need an ND filter to allow for the slower shutter speeds necessary to create the sense of movement. I didn’t need one for this image because I shot at sunset and just raised my aperture to slow my shutter speed to 1 second to create the look I wanted. If you are new at this technique, I would recommend trying it when you are out for another landscape. It can be interesting to see the comparison.
Selecting the Frame
ICM landscapes are purely subjective so think about what emotions you want to evoke in the viewer when deciding what to include in the frame. Experiment with different types of movement, such as panning, tilting, or rotating the camera, to create unique and expressive effects. Adjust the intensity and speed of your movements to control the level of abstraction and blur in the final image. Remember, despite the intentional blur and abstraction of ICM photography, composition remains essential for creating visually compelling images. Pay attention to elements such as lines, shapes, colors, and textures within the landscape, and use them to guide the viewer’s eye and create visual interest. I like to use light and color to enhance the mood and atmosphere of ICM landscape images. Experimenting with different lighting conditions creates dynamic contrasts and shadows within the scene. I also like to explore using bold and vibrant colors (like the ones at sunset) to add visual impact to my composition.
Processing the Image
Enhance the contrast and texture in post-processing. Use editing techniques to enhance contrast and texture within the ICM image, adding depth and dimension to the abstract forms and shapes created by the movement. Adjust levels, curves, or contrast sliders to bring out details in the highlights and shadows, creating a more dynamic and visually engaging image. Explore creative color grading and tonal adjustments to enhance the mood and atmosphere of the ICM landscape image. Experiment with saturation, hue, and color balance to create vibrant and harmonious color palettes that complement the abstract forms and textures captured in the image. I changed the white balance setting to cloudy to change up the colors and make the image more dynamic.
Closing
Mastering the art of landscape photography is a journey that encompasses careful planning, skillful shooting, and meticulous processing. By considering the unique characteristics of each landscape, leveraging compositional techniques, and harnessing the power of post-processing tools, you can transform ordinary scenes into extraordinary works of art. So, whether you’re capturing the rugged peaks of the Grand Tetons or the serene beauty of a Milky Way-lit sky, remember to approach each step with creativity, patience, and a deep appreciation for the natural world.
Ready to embark on your landscape photography adventure? Grab your camera, explore nature’s wonders, and share your stunning captures with the world. Don’t forget to tag me in your posts and let me know about your experiences! Happy shooting! If you like this post and want to see more like it, drop me a comment and let me know!